Archives for category: Uncategorized

For some reason I’ve always been vaguely wary of chocolate cake. I never order it at restaurants, or take a slice when relatives offer it up as a dessert. Unconsciously I guess I just reject the notion of eating something so rich and so completely full of chocolaty goodness. Yet inexplicably this cold weather and the exclusion of all remotely rich foods from my diet after Christmas, has obscured this apprehensive outlook. I opened recipe book after recipe book, scoured websites, friends and family for the ideal cake to cook. Again and again chocolate cake seemed the obvious choice.

A big problem is the expectation of perfection that goes with a chocolate cake. When making chocolaty flavored food, so many things can go wrong. The richness, the wrong consistency, clashing flavors and over coffe-ified. People anticipate, as they bite into a chocolate cake, to experience  a cake that fulfills their chocolate cravings without any alterations or substitutions. So needless to say the pressure was on. Thankfully this recipe proved my fears unfounded,  and I spent the afternoon sampling slice after slice. Get ready for the classic chocolate cake courtesy of Crazy for Chocolate by kitchen library (adapted slightly).

Btw: This brings me to another point. Despite the name of the blog, I haven’t strictly made anything that called for a bulk of the flavor to come from chocolate. Hmmm…I’m thinking chocolate soufflé? (okay I admit it’s a weakness of mine).  

Ingredients:

125g butter

1 cup brown sugar

1tbs instant coffee powder

2 eggs

1 tsp vanilla essence

1/3 cup self -raising flour

1 cup plain flour

1 tsp baking soda

1/2 cup cocoa powder

3/4 cup milk

1/2 cup semi-sweet chocolate chips

For icing:

4 oz. semi-sweet chocolate chips

3 cups confectioners’ sugar

1 stick unsalted butter

3 tbs milk

2 tsp vanilla extract

Method

Cake:

1. Preheat the oven to 350 °f. Grease two pans (8 inch) and set aside.

2.In a large bowl, using electric beaters, beat the butter and brown sugar together till creamy and then beat in the coffee power. Add the eggs one at  a time beating well after each addition and then add the vanilla essence.

3. Sift in all flours, baking soda and cocoa alternatively with the milk. Once beaten in, stir in the chocolate chips and pour into the round pans. Bake for 25 minutes all until a skewer comes out clean. Allow 30 minutes to cool and begin on icing.

Icing: (adapted from Williams and Sonoma)

1. Have all the ingredients at room temperature. Melt the chocolate in a glass bowel over a pan of simmering water. Stir until the chocolate is melted and smooth. Let cool to room temperature.

2. Beat together the confectioners’ sugar, butter, the milk, the vanilla essence. Add the chocolate and beat until combined. If the frosting is dry, add more milk, 1 tsp. at a time, until it is creamy but still holds peaks.

3. Spread the top of one cake with the icing and place the second cake on top. Spread the remaining icing all over the outside of the entire cake.

Breakfast has always been an awkward meal. Considering the majority of people are half asleep when they partake in their first meal of the day, or skip it altogether depending on time constraints, its ended up with a less than promising reputation. My routine cereal rut, ended abruptly, when a snow day made everyone yearn for a change. This morning the neighborhood now was transformed into an almost comical, toy town village. It called for less than typical meal times. I whipped up  this recipe on a whim (and impatient relatives). It’s straightforward, it’s sweet, it’s melt- in- your- mouth cinnamon toast.

The recipe is so ludicrously simple, I didn’t even bother with adjustments, The Children’s baking book (a classic haha) states:

Ingredients:

1 tsp ground cinnamon

2-3 tsp sugar

1 egg per slice of toast

2 tsp vegetable oil

Slices of bread (2 per person)

Method:

1. Whisk together the ground cinnamon, sugar and the eggs. Dip and coat the slices of bread in the mixture. Fry  in vegetable oil over medium heat till golden brown.

2. Here’s where we get creative, nutella, jam, powdered or regular sugar, peanut butter and maple syrup all compliment the toast as a topping. Serve with hot chocolate on frosty mornings or as a midnight snack with cold milk. Really that’s it.

Since its inception and integration into the workforce (for woman at least) the white shirt has always been underestimated. I, myself have been guilty of throwing one on in the case of having no inspiration or anything else ironed. Still, even if some (one) of these style(s) are wholly impractical and frivolous, the fundamental concept is to recreate the shirt’s definition. Though not work-appropriate casual lunches and holiday getaways are the perfect destination for these looks. For each outfit the constant piece is the gap white shirt, a staple item for anyone.

This look integrates a full pink tulle skirt, incorporated in by a denim belt and pale pink cami. The shoes are suede booties and though I didn’t here, colored tights set the mood for fun and a colder climate!

It’s all in the details. Faded skinny trousers in cackey goldy-bronze pumps  and stacked long necklaces (vintage finds). Simplicity in all its glory (though I couldn’t resist the bling). In the spirit of including novelty or sentimental pieces in this, the pearl and plastic bunny necklace, represents children’s dress up with a somewhat elegant twist.

Pumpkins may scream Halloween (haha) and Thanksgiving  to mainstream America, but to a native Scot, they are typical somewhat basic veggies. I decided to re-master the pumpkin in a stir fry that looked both aesthetically pleasing and healthy. The cinnamon taste that usually accompanies and characterizes a pumpkin was forgotten as the it was paired with cumin, brown sugar and orange juice. So without further ado,  ladies and gentlemen the redefined pumpkin featured in a Pumpkin and Cashew Stir-fry! Adapted from Vegetarian cooking, a common sense guide.

Ingredients:

2 tbs Vegetable oil

1 cup cashew nuts

1 leek (white part only) sliced

2 tsp ground coriander

2 tsp cumin

2 tsp brown mustard seeds

2 crushed garlic cloves

4oz butternut pumpkin (peeled and diced)

3/4 cup orange juice

2 tsp brown sugar

Steamed rice (to serve)

Method:

1. Heat a large frying pan or wok with vegetable oil. Stir fry the cashews until golden then drain on a plate covered in paper towels. Stir fry the leek till soft and remove.

2. Add remaining oil and fry the spices and garlic till mustard seeds begin to pop. Add the pumpkin and coat with the spices. Fry till the pumpkin is tender.

3. Add the orange juice, brown sugar and bring to the boil. Reduce heat and cook for a further 5 minutes. Return all previous ingredients and toss. serve on top of the steamed rice (I prefer brown). I recommend dessert as this meal was fairly light.

I broke every rule in the book with this recipe if it can even be called that. Nearly everything was premade for me in plastic containers yet the idea was cute and quirky and I caved. The picture below basically explains the entire concept but in case there are any doubts: I took premade miniature waffles topped them with whipped cream added fruit and sprinkled the entire concoction with powdered sugar, simple yet delightful.


‘Organization is a hobby of mine’ is a statement you seldom hear from any home maker old or young, but it just so happens to be my passion. For me, there is nothing like the delight and elation in opening drawers and closets where you can instantly identify where everything is.  This weekend I took the time to tackle some of the worst culprits for mess, namely some neglected bedside drawers.  The procedure is simple: clear everything out of the space, throw away anything unnecessary and replace things by grouping similar items together.

Below are some tidy areas to inspire. First a box of old hotel key cards collected from travels. Eventually I’d like to do some kind of display with them, but in the mean time I just needed organization. I hand painted and decorated the box one rainy afternoon, I thought the shells reminiscent of seasides and sunshine would provide me with some optimism for clearer days. The DVDs make up a part of my collection that has filled countless shelves, and the model of New York is from about 5 years ago, acquired on top of the empire state building. Below that are some before and afters.


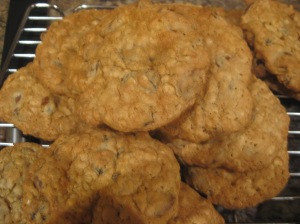
  With the holidays over and the cold weather really setting in, the months ahead look decidedly grim. The novelty of Christmas presents have worn off, the tacky holiday sales set teeth on edge and any mention of holiday music or more visiting relatives makes life that much more miserable. Forget the endless piles of leftover turkey, the Christmas lights that still have to be taken down and most of all the growing piles of left over ‘holiday cheer’! Still mourning the end of the holidays myself, I decided to cheer myself with some classic chewy oatmeal and chocolate chip cookies. With each bite the general morale of my family and friends was raised, grins lit up every face and I felt at peace. It’s time to be joyful!  Christmas may be gone but all hope is not lost, where there are cookies there will be love, and lots of grabbing hands :).  The recipe is adapted from The Great Christmas Cookie Swap by Good Housekeeping. IMPORTANT: This makes a whole lot of cookies so you probably want to make a half batch.

Ingredients:

3 cups all-purpose flour

4 tsp baking soda

a pinch of salt

1 1/2 cups sugar

1 1/2 cups brown sugar

3 sticks butter

4 eggs

4 tsp vanilla extract

4 1/2 cup oats (uncooked)

2 cups raisins

2 1/2 milk chocolate chips

Method:

1.Preheat the oven to 350 °C. Cover 2 baking trays with baking parchment or grease with butter. In a medium bowl  use a whisk to mix the flour, baking soda and salt.

2. In a large bowl  with the electric mixer, beat the brown and regular sugar together with the butter. Beat in the eggs one at a time and then the vanilla extract. Then in small additions, beat in the flour. Add the oats, raisins and chocolate chips and mix in gently with a wooden spoon.

3. Bake for 10-12 minutes. Serve slightly warm and keep lots of milk on hand. Silly straws are optional!

My first and foremost love where cheese is concerned, is goat’s. The sweet tang only accentuated by musky overtones first awakened my taste buds in a small Mediterranean restaurant in the heart of London. I can still remember the waiter clasping steaming piles of food and my bruschetta, while my parents and I waited in fervent anticipation. It was love at first bite and I haven’t tasted any cheese that stuck with me so profoundly  since. Okay, I’m being dramatic but this cheese is really good! My latest cookbook contained a recipe on Goat’s cheese and olive tart, and so was perfect to share as my first savory meal on drizzled with chocolate. This is adapted from the recipe book Vegetarian cooking-a common sense guide by bay books.

Ingredients:

The base:

1 cup all-purpose flour

1/4 cup olive oil

1/3 cup iced water

The filling:

1 tbs olive oil

2 diced onions

1 tsp thyme leaves

1/2 cup ricotta cheese

3/4 cup goat’s cheese

12 or more pitted olives

1 egg slightly beaten

1/4 cup heavy whipping cream


1. Sift the flour and a pinch of sea salt into a large bowl, then make a hollow in the middle. Pour the olive oil into the well, and mix in with a knife till the mixture is crumbly. In small additions pour in the iced water mixing in with the knife each time. Gather dough into a ball and cover with cling wrap. Refrigerate for 30 minutes. If the dough become too moist or too dry, feel free to add more flour or water.

2.  In a pan, cook the onions in the olive oil, covered  and on low heat for 30 minutes. About 15 minutes through the cooking time add the thyme, and salt and pepper to season.

3. Preheat the oven to 350°F and place the tart pan inside to warm up. Flour the work surface and roll out the pastry. After about 8 minutes, lift the pan out and place the pastry inside. The excess overlapping pastry should be folded back inside the pan to form a crust. Fill the inside with a layer of onions. Sprinkle or spread on the cheese followed by the olives and thyme.

4. Mix the egg and cream together and pour over the top of the tart. Bake the tart for 45 minutes until the pastry is golden.  The tart is fabulous as a light dinner or picnic lunch. 

P.S. Since the Crescent Biscuits were such a huge hit, I used the remaining dough today with strawberry and blackberry jam as a dessert.

Formal attire seems almost dated in an age where sweat pants and stained t-shirts have become staples in the common man’s/woman’s closet. Even at official events jeans are common place and the most formal part of people’s appearance is their makeup (at least as far as women go). I feel for many of my most treasured and distinctive apparel, there is simply no occasion to showcase them. This year despite the effort involved, I intend to try and dress up as much as possible. Hopefully I can still let my dressy clothes shine while they still hold their fresh or unique appeal.

The outfit I put together below contains a very sentimental article of clothing. The skirt war purchased in Singapore (where I lived for 2 years) and is part of the uniform for flight attendants. Though I also own the top (substitutes nicely as a layering piece) I wanted the skirt to shine individually. I paired it with a thin cotton blouse, adorable bowed peep toe heels and socks due to the chilly conditions. The ring is an online purchase and despite its large size, the intricate detail makes it delicate when paired with other loud pieces.

I know,  I know, my post was a little delayed, but I fully intend to make it up to you in the form of these delicious biscuits. And at any rate, what would a new year be without the chance of redeeming and revolutionizing past failure or ‘ahem’ plain absentmindedness? This New Year will certainly  hold new beginnings for me. Not only have I developed a new-found appreciation for writing and sharing my cooking enterprises , I can now share my passions with a far wider audience then I had ever previously imagined. Blogging fills me with a real anticipation that I can hopefully offer some inspiration to other budding bloggers and find a new connection and insight into the web.

My fully attainable (optimistically) resolutions:

1. Expand and develop  drizzled with chocolate

2. Focus on the organic, or at the very least, healthier aspect of cooking

3. Participate in some community service

4. Run in some more 5K runs

5. Walk the dog routinely

Hope everyone enjoyed their holidays, Happy 2011!

Now to the part you’ve been drooling for, crescent jam biscuits (cookies). Adapted from Smitten Kitchen’s Crescent Jam and cheese cookies.

Ingredients:

2 sticks of butter (soften)

8oz of ricotta cheese (leave on a paper towel to harden slightly)

2 tbs sour cream

1/4 tsp vanilla extract

2 cups all purpose flour (with additional flour for rolling out the dough)

Pinch of salt

1 jar jam

1 small bowl milk (to brush biscuits before baking)

1 small bowl powdered sugar (sprinkle on top of baked biscuits)

Method:

1. Use mixer to cream the butter in a large bowl. Push the ricotta cheese through a sieve and add to the butter and mix the two. After adding the sour cream and vanilla extract, using a separate smaller bowl to sift flour and salt together. In small additions, whisk the flour mixture into the buttery mixture. Chill the finished dough for a minimum of 2hrs and 30 mins.

2. Preheat the oven to 400°F . Thoroughly flour the work surface and rolling pin, and roll out the dough very thinly. Using a large circular cookie cutter cut out circles form the dough. Fill with 2 tbs of jam (less is always more as the jam tends to explode out of the pastry when used in large quantities). Fold the circles over  and seal the sides by pressing down firmly several times around the edge.

3. Brush with milk and bake for 17-19 minutes (until the tops are golden). Wait till cool and dust with the powdered sugar. These sticky delights can be paired perfectly with hot chocolate or early morning coffee.

After stuffing myself silly with dozens of Christmas themed delicacies, I was frantic for some new flavors in my life. The mint-chocolate or rich-spicy concoctions had run their course by mid-December. I broke out my brand new (and pristine)cupcake recipe book.  After flipping through pages of heavy and berry orientated indulgences, I happened upon coconut cupcakes with a lime filling. Since our small town has yet to experience a single flake of snow, their glimmering white exteriors and artfully coconut topped summits called to me.  A little tropical paradise thrown in to brighten boxing day and beyond? I think so.

My recipe is adapted from The book Cupcakes by Shelly Kaldunski .

Coconut Cupcakes with lime filling

Ingredients:

40g sweetened and shredded coconut

(with extra for topping each cake)

155g flour

1 1/2 tsp baking powder

pinch of salt

220g sugar

125g butter

1 large egg and 1 egg white

1 tsp vanilla extract

125ml coconut or regular milk

180ml Lime/Lemon Curd

Coconut butter cream

(make regular butter cream but add  1 tsp of coconut extract)

Method:

1. Preheat the oven to 350°C, 180 °F or gas mark 4. Line a 12-cup pan with cases.

2. Whisk the coconut, flour, baking powder and salt together in a medium size bowl. In a separate larger bowl, beat the sugar and butter till fluffy. Whisk in the eggs and vanilla extract. Add the flour mixture into the buttery mixture in small quantities (4 or 5) beating well after each addition.  Then whisk in the milk, again in small quantities and beating well.

3. Pour the mixture into each case about 3/4 of the way full . Bake 18 minutes , and test with a tooth pick (The pick should come out clean or with crumbs when stuck into the cakes. If not, bake for a further 2 minutes). Let the cupcakes cool.

4. Hollow out a round piece in the center of each cake about halfway through. Fill each hollow with lime curd. Frost each cake with the butter cream and garnish with shredded coconut. Serve with chilly lemonade and a sunny smile!